Blueberry Cupcakes

So I had a little time to myself today and decided I wanted to try out a twist on the basic vanilla cupcake. I bought myself some fresh blueberries and set to work on making the sponge mixture.

The idea behind using blueberries was because I wanted to have a burst of fruit when you bit into the cake. And balance out the sweetness of the buttercream.

DSC_0354I simply added around 125g of blueberries into my cake mixture before spooning out into my cupcake cases. Here they are just cooling before I add the buttercream.

DSC_0355 DSC_0356To make the buttercream, I simply mixed together icing sugar, butter and vanilla extract and once it was ready added some pink and grape food colouring from Sugarflair to get the desired colour. I then placed into a piping bag with a Wilton 1M star nozzle and started in the centre then worked outwards to create the flower effect. I topped off with some blueberries and iridescent sugar balls.

DSC_0359The finished effect was absolutely delicious. The delicate blueberries work really well with the vanilla and sweet buttercream. And the fresh blueberries on top add an extra hit of juice. Yummy!!


Colourful Cupcakes

I had some spare time last weekend and so decided to bake up a batch of cupcakes. Nothing too fancy, just some simple vanilla sponge ones because I wanted to have a practice with decorating.

I like to play around with my different nozzles and colours, they don’t always turn out the way I imagine them in my head. But it’s all good practice.

Cupcakes

This time I used two nozzles from the Little Venice Cake Company #109 and #2C.

DSC_0333

Left – 109 / Right – 2C

I also used the colours turquoise, deep purple and pink from Sugarflair.

DSC_0334


For the two shades of buttercream I added a few drops of Wilton White Icing Colour before adding my colours. This helps to give a true colour when using the turquoise, so instead of having a yellow / green tinge from the butter it’s more crisp and blue – as it should be.

I then separated the mixture into two bowls and added a small amount of colouring using a cocktail stick. It’s best to start small and build up the colour to your liking. Once mixed to the right shade, I scooped into icing bags with my two nozzles.

For the decorations I used white sugar paste and added the pink colouring to some of it. I then used a selection of cutters to create the daisies and leaves. Once the sugar paste had dried out a bit, I assembled the different sized/coloured flowers in a variety of patterns to create different looks.

And voila! Some pretty, yummy cupcakes for a Sunday treat 🙂

Delicious salmon in 30 minutes

Salmon

I love this recipe because it’s so quick and simple. With a little bit of prep you literally just chop the vegetables and bung them in the oven for 20 minutes.

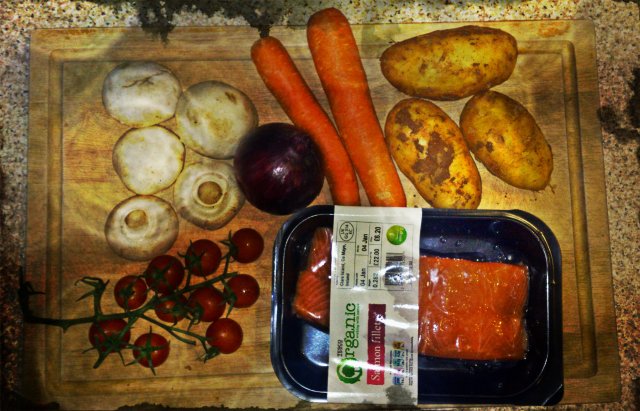
Salmon is a great fish, packed full of essential oils and protein that help you keep a balanced diet. And it tastes lovely too! This dish is something I threw together once with all of the leftover vegetables / salad ingredients in my fridge and cupboards. It turned out to be one of my favourite meals because of its ease and the fact it tastes so good. It also scores points on the health-o-meter.

This can be created for as many people as you wish or even if you’re dining solo, you just need to adjust your amounts. The following ingredients serves two.

Ingredients

2 x salmon fillets

1 x red onion cut into quarters (you can use a white onion if you wish, but I find the red ones taste sweeter)

5 x closed cup mushrooms cut into quarters

10 x cherry tomatoes whole (I like to buy mine on the vine as again they give a sweeter taste, but feel free to buy whichever you prefer)

1 x red or yellow pepper roughly chopped

2 x carrots peeled and cut into sticks

For the potatoes, if you’re using normal sized potatoes e.g. Maris Pipers then three of these should be sufficient. Peel and chop into large chunks. If you’re using new potatoes then use five and cut into halves.

Step by step instructions:

1. Preheat the oven to 190 degrees centigrade for fan assisted. Please adjust accordingly for conventional ovens.

2. Drizzle a good two tablespoons of extra virgin olive oil into a large deep baking tray and place on middle shelf.

3. Prepare your vegetables.

4. Steam your carrots and potatoes. I usually steam the potatoes for 30mins and carrots for 15mins.

N.B. If you would like to roast them instead this is fine, but the potatoes will need to be par-boiled for 10mins prior to roasting as this helps them to cook quicker. You will also need to prepare a second baking tray so that you’re not trying to cook too much food in one.

5. Prepare your salmon by coating in extra virgin olive oil and then dust with dried dill and parsley. Remove the baking tray from oven and place your salmon into the centre.

6. Add your chopped mushrooms, onion, pepper and tomatoes into the tray and spread around evenly. Drizzle more oil to ensure they are all coated. Season with black pepper and salt.

7. Place tray back into the centre of your oven and cook for 20mins. After 10mins check back and give the vegetables a stir, this ensures they cook evenly.

Et voila! Your tasty salmon and roasted vegetables dish is done and ready to serve.

Enjoy xx

Fresh Faced

Part of my new ‘healthy habit’ is to start taking better care of my skin, and in particular my face. Now that I’m the grand old age of 31, it’s something I’ve been thinking more and more about.

I’ve been cursed or blessed (whichever way you want to think of it) with having oily skin. This means I’m prone to breakouts, wonderful! But apparently it also means my skin will age better. I’ve been told on a number of occasions that I look much younger than my years and if I look at both my mother and her mother, their skin has aged beautifully. So even though I absolutely hate when the odd pimple makes its appearance, at least I can live in the hope that when I’m 60, I won’t look a day over 50!

Anyway back to the reason of my post. My daily beauty regime consists of cleansing my face with a baby wipe, washing with Visibly Clear Pink Grapefruit Cream Wash by Neutrogena and then applying Daily Skin Brightening Moisturiser SPF15 by Aveeno which I find is nice and light for my skin. I have started using an eye cream as well, also by Aveeno.

Some days I’ll wear make-up and other days I like to give my skin a break. Particularly if I’m not planning on leaving the house 🙂

I occasionally use a scrub and mask, but should do more often as I’ve been told it helps clear the pores and rejuvenate the skin. But which products to use? There are so many out in the market ranging from low cost to the price of a small car. I like to buy based on reviews but decided I wanted to try something different.

So, I had a quick look online for some homemade scrubs and masks and came across quite a few. I’ve picked around five of each that I’m going to try and the first one was a banana, peach and honey mask. It’s suitable for combination skin as the banana is soothing and highly moisturising. Plus they are non-oily so great for areas with excess oil. Peaches remove any excess sebum, which if you know anything about spots, is one of the causes if it builds up and clogs pores. Honey is great for reducing redness and dries out any existing spots. Also included are ground almonds and rolled oats to act as a gentle exfoliator and remove dead skin cells.

face mask

It’s very easy to make and you can freeze the mixture and use a bit at a time. All you need is the following:

2 x ripe bananas

2 x ripe peaches

2 x tbls honey

2 x tbls ground almonds

handful of rolled oats

Instructions:

Peel and chop the bananas into small chunks. Remove the skin and pip from peaches and chop into small pieces. Put them in a blender. Add your honey and mix for a few seconds until smooth. Add in your ground almonds and rolled oats then mix for a further 10 seconds.

The consistency will be quite loose so I put it into the freezer for about 30mins before applying. Whilst I was waiting I ran myself a bath to prepare my skin. Once applied, leave on for 15mins and then wash off with warm water.

It is quite tricky applying the mixture so I lay on my bed and placed a towel over the pillow to prevent any of it marking my sheets. It also looks a bit dubious once dried but hey if it’s good for the skin, I’m not complaining.

After the first application I haven’t really seen much difference so I’ll wait a week and try again. I’ll keep you posted on the results.

Health Kick

As part of my plan to be more proactive in 2013, I’ve decided I want to be a bit healthier. Yes I know that seems to be everyone’s new year resolution after all the overindulgence at Christmas, but I’m determined it’s not going to be a fad and come 1st February I’ve returned to my old ways.

For a large part of 2012 I was very good, and had developed a routine of visiting the gym. I even got up to working out four times a week. I know, impressive eh?! But after an annoying back niggle (which happens frequently) I had to stop working out and try Pilates instead. This set me back and I still haven’t had the motivation to go back. Mixed in with the fact when I changed jobs, I had free gym membership so cancelled my existing one, and then when I left said job, the free membership went with it. So no gym membership = no work out! Therefore one of my tasks, will be to rejoin my old gym and start exercising again.

s

I’m generally quite a healthy person anyway. I eat a varied diet (most of the time) with fresh vegetables and some fruit – must eat more!! And I walk my dog every day, sometimes three times a day. But I could always do more to look after myself, inside and out.

During a recent visit to the beautiful island of Jersey, I visited their local market. What a wonderful experience this was. Bursts of colour and freshness from the fruit and veg stalls. Succulent pieces of meat from the butchers and the tastiest cheese I’ve ever had the pleasure of eating. They had vegetables I’d only ever seen on TV including purple carrots! I felt inspired and made the decision as soon as I got home, I would be visiting the nearest farmers market I could find.

farmers market2


Along with eating more fresh fruit and veg, I’m going to cut out alcohol. During the last few months of being off work, I began to notice I was drinking every day. Whether it was a glass of red, a chilled Baileys with some ice or a dash of bubbly. Because I didn’t have to get up for a hard day’s graft, I convinced myself it was OK. Don’t get me wrong, I wasn’t drinking the entire bottle but still, I feel like I need to give my body a rest and a bit of a detox. So starting this month, I’m going to have a rest from booze and see if I notice any difference. I’ll keep you posted!

Festive Food

Well it’s been a busy few days for me, what with getting everything ready for the big day. Making sure I haven’t forgotten anyone’s presents, lovingly wrapping them as well as making some homemade puff pastry mince pie swirls.

I do like a bit of mince pie, but this year I decided I would try and make my own. So I had a quick look online for some recipes and come across this one. It’s a really easy recipe and takes only a few minutes to prepare. And the mince pies taste delicious, if I do say so myself.

Mince Pies

Serve with a drizzle of single cream and some champagne mixed with pomegranate juice, for a real festive twist.

Champagne

Click here if you fancy having a go at the recipe.

Enjoy and Merry Christmas! x

Red onion, tomato and feta cheese pizza

This one is for all you pizza lovers out there. I don’t know about you but the last few times I’ve ordered a take-away pizza, it’s left me feeling greasy, stuffed and generally uncomfortable. I’ve gone from only ever eating a Dominos ‘Full House’ to making my own using whichever flavours I fancy at the time.

This particular pizza is quite light and I tend to serve with a small salad on the side (I convince myself it’s part of my five a day!!)

Pizza

Recipe details below

Enjoy! x

Serves Two

Ingredients:

Half of one red onion
Ready to mix pizza dough
Tomato purée
6 x cherry tomatoes on the vine
Fresh basil leaves
100g low fat Feta cheese
Balsamic glaze

Preheat your over to 220 degrees (when using a fan oven please adjust your temperature accordingly.)

1. Prepare the pizza dough according to the instructions on the packet.
2. Once the dough has been rolled out, apply a small amount of olive oil to your baking tray using a piece of kitchen towel. Place the dough on the tray.
3. Peel and slice your onion into thin discs. I do them thin so that when you bite into the pizza, the flavour does not overpower.
4. Wash and slice the tomatoes.
5. Apply a good sized dollop of tomato purée to your base and spread using the reverse side of a dessert spoon. This will give you an even coverage.
6. Next add your sliced onions.
7. Followed by your tomatoes.
8. You then crumble the Feta cheese over the pizza, making sure there are no gaps.
9. Drizzle some Balsamic glaze over and then place in the oven.
10. Cook for 15mins.
11. In the meantime chop up some basil leaves to garnish.
12. Once ready, scatter your chopped basil over the pizza and drizzle with a little more Balsamic glaze then serve.

A perfect pear…

poached pear

I visited the in-laws at the weekend and had such a lovely time chatting, eating and drinking. It was a weekend of overindulgence, but hey it’s close to Christmas so I’m allowed aren’t I?!

Anyway, I had the pleasure of trying a deliciously simple treat, which you may have already tried but I wanted to share the recipe with you so you could enjoy this taste sensation.

The dish is poached pears with vanilla, sugar and ginger and I’ve posted the recipe below. It’s ideal for all seasons as in autumn / winter it can be served warm or in the summer you can chill in the fridge overnight. And if you’re feeling extra cheeky you can serve with a small dash of single cream….yummy!

I’m not a huge lover of pears, but this dish is delicious and the flavours are very delicate and subtle, especially the ginger.

Enjoy! xx

Serves 4:
4 large firm pears
1 lemon
3 tablespoons sugar
600 ml (1 pint) water
1 vanilla pod, split in half
6 slices fresh root ginger.
Squeeze juice from lemon.
Combine lemon juice with the water, sugar, sliced ginger & vanilla pod (I seperate the seeds with the back of a teaspoon then add seeds & pod seperately, get more flavour out of it that way).
Bring to boil & stir til sugar is dissolved (might need to whisk a bit with fork / hand whisk to seperate the vanilla seeds if they clump )
Take saucepan off heat,
Peel and halve the pears (remove stalks & pips) and add pears to the syrup in the saucepan.
Cover saucepan and simmer gently for about 15-20 mins, dep. on firmness of pears.
Remove pears and vanilla pod with slotted spoon.
Boil the remaining syrup over a high heat for about 15 mins to reduce it.
Remove the ginger slices.
Pour the syrup over the pears.

Mouthwatering Mushrooms

So, my husband ordered our food shopping on-line (as he does every week) and instead of receiving 12 individual mushrooms, they gave us 12 boxes of 380g mushrooms!! What does one do with so many mushrooms?!

Well, we decided to make some breaded mushrooms with a garlic mayonnaise dip. It’s such an easy recipe with a tasty result, and a perfect way to use up some mushrooms. They can be served as a starter if you’re planning to host dinner one evening, or as a quick tasty snack.

Step by step instructions are below:

1. Preheat your over to 190 degrees C (I have a fan oven so adjust as necessary).

2. Wash your mushrooms to get rid of any dirt.

3. Prepare three bowls for your plain flour, whisked eggs and breadcrumbs. Depending on how many mushrooms you’re using, I used around four tablespoons of flour and breadcrumbs per 12 mushrooms and one egg whisked.

4. Take a mushroom then coat it in an even layer of flour. Dust off any excess.

(tip: to avoid getting flour/egg/breadcrumb encased fingers, use a different spoon for each bowl)

5. Place the mushroom in your egg mix and again coat with an even layer.

6. Drop the egg coated mushroom into your breadcrumb mix and make sure it’s coated.

7. Place on a baking tray and repeat this process until all of your mushrooms are coated. Put in the oven for 15-20mins.

To make the garlic mayonnaise I simply put around six tablespoons of light mayonnaise, crushed two cloves of garlic and mixed in. I then added a teaspoon of Dijon mustard and the juice of half a lemon. Season to taste. You can adjust the measurements according to your personal taste, i.e. if you like extra garlic then throw another bulb in 🙂

As an extra option you can serve with some crusty bread or toast.

Enjoy!! xx

Cupcake Heaven

So, I had a bit of spare time yesterday and as it had been a while since I last baked some cupcakes (I was getting withdrawal symptoms, don’t laugh!!) I decided to try a chocolate recipe.

Most people I know love chocolate so I figured I’m on to a winner with these 🙂

The recipe is from a book called ‘Love Bakery: Cupcakes from the Heart’ and it’s fantastic. Great for beginners with easy to follow instructions, resulting in some seriously tasty cupcakes! If you’re interested, you can purchase from Amazon here.

....they look much better in the flesh :-)

….they look much better in the flesh 🙂